Traverse Global v11.2 - Service Repair
User Interface Overview -- Traverse v11.2
The user interface for Traverse v11.2 offers a variety of ways to navigate through applications, as well as configure the interface to give you more real estate. The updated user interface is flexible enough to accommodate your preferences, whether you like to use icons, descriptive labels, or only the menu bar for navigation.
Orientation
This illustration shows you the basics of Traverse navigation.
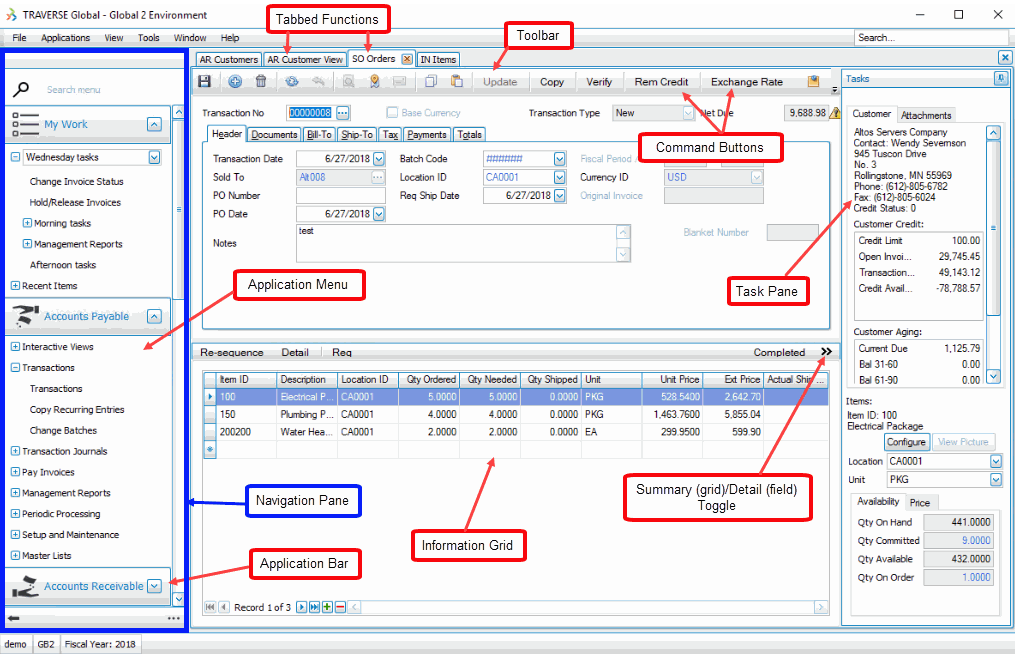
The main part of the interface is where you interact with the applications and functions. The primary flexibility of the interface lies in the navigation pane on the left side of the screen.
Each application menu can be expanded or collapsed to show or hide the navigation tree by using the expand ( ) and collapse (
 ) arrows. Each application menu is organized in a familiar navigation tree, with plus/minus signs to expand and collapse the branches.
Search
Use the Search box at the top of the navigation pane to search the menu for a function rather than manually navigating through the application bars.
Type a term for the menu option you are looking for in the Search box. The results will appear as you type.
Click on the menu option you want.
To clear the search box, click on the “X”. The navigation pane will return to its original state.

My Work
The My Work menu was introduced in Traverse v11.2 as a replacement for the Favorites menu in Traverse v11.0. The My Work menu allows you to group the functions you use most often onto one menu for quick access instead of switching between applications and application menus. You can also use the My Work menu to set up workflow-based menus (profiles). When you open Traverse, the default My Work menu, if any, appears at the top of the application bar.
 WWWWW
WWWWW

The default My Work menu is shown when you open the interface, but you can choose a different My Work menu from the drop-down list.
The Recent Items entry will display the latest functions you used in the current session, giving you a quick way to re-open them.
Alternate Access to Menu Bar options
The Menu Bar is similar to the menu bar in other programs. It is where you can access available functions, as well as set preferences, find program information, organize windows, and open the Help files.

At the bottom of the navigation pane you will find icons that give you access to many of the options you find in the Menu Bar.

The arrow on the left side of the bar ( ) opens a Settings menu that includes options from the File, View, and Tools menus on the Menu bar.
![]()
The Search box remains at the top of the navigation pane to allow you to search for a menu option.
You can change the workstation date in the Date field.
You can change the company in the Company field by selecting another company from the drop-down list.
A Help menu is also available, which includes options from the Help menu on the menu bar.
To return to the application bar, click the arrow again.
The ellipsis on the right side of the bar opens a popup menu that includes options from the File, View, Tools, and Window menus from the Menu Bar.

The Search box remains at the top of the menu. The Window drop-down menu is the same as the Window menu on the menu bar.
The Main Menu switch below the Window drop-down menu will hide (off) or show (on) the Menu Bar at the top of the screen.
You can change the workstation date in the Date field.
You can change the company in the Company field by selecting another company from the drop-down list.
There are buttons to access the My Work menu, Preferences, the Dashboard (if activated in Preferences), the Logout command, and the Exit command to close Traverse.
Navigation Pane Resizing
There are multiple ways you can adjust the amount of space the navigation pane takes up on your screen. The easiest way is to move the mouse over the right edge of the pane until the pointer becomes a two-headed arrow, then click and drag the edge of the pane to the desired size.

To minimize the navigation pane and maximize the space available for the Traverse interface, move the mouse to the left edge of the pane until a shadow appears with a tiny arrowhead.

Click the shadow to minimize the navigation pane, leaving only the icons to indicate the application. Hover the mouse over an icon to see a tooltip with the application name.
When you click on an icon, the flyout menu with the main branches of the application menu appear. Click on the expand icon (plus sign) to open the tree view of the menu.
